The Step-by-Step Guide to Setting Up Your Trezor Hardware Wallet
- 16 Dec 2025
🛡️ Maximum Defense: Setting Up Your Trezor Hardware Wallet
Trezor, the original hardware wallet, is lauded for its open-source security model. Its setup process, managed through the Trezor Suite application, is slightly different from other wallets, focusing heavily on on-device confirmation to maximize security.
Phase 1: Purchase and Initial Security Check
🛑 Security First: Where to Buy Your Trezor
To guarantee you receive a pristine, untampered device, you must avoid third-party resellers.
CRITICAL WARNING: NEVER purchase a Trezor device from Amazon, eBay, or any unofficial third-party. Only buy directly from the manufacturer. If your device appears to have been opened, or if it comes with a pre-written Secret Recovery Phrase, DO NOT USE IT and contact Trezor Support immediately.
Always purchase directly from the manufacturer.
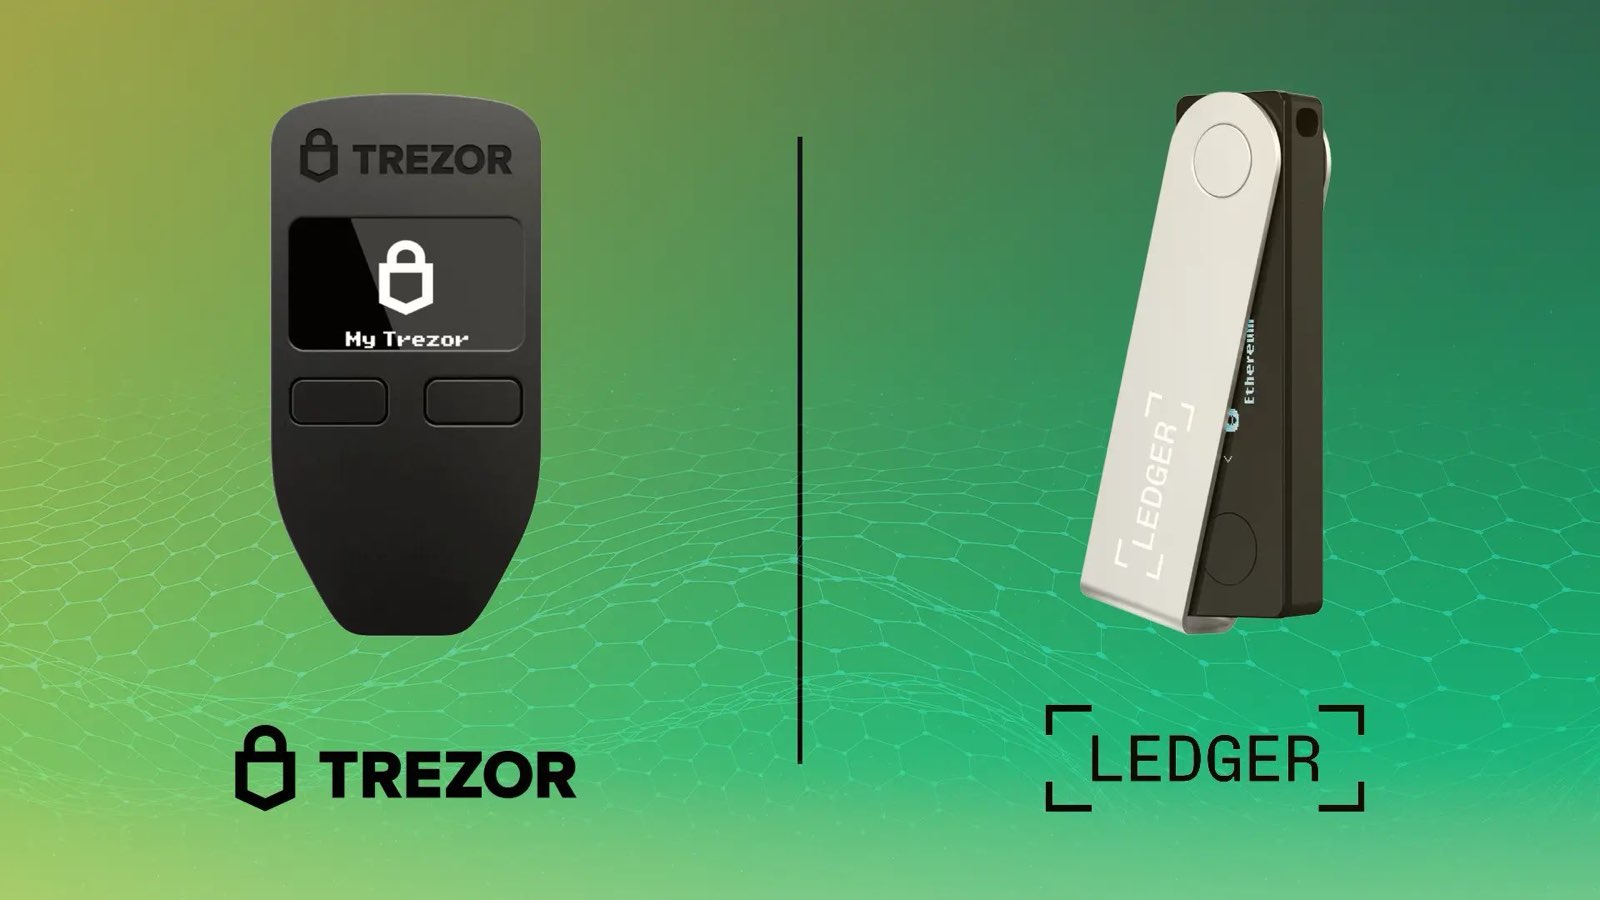
⚖️ Comparing the Trezor Models
Trezor offers two main models, the cost-effective Model One and the feature-rich Model T.
| Model | Approx. Price (USD) | Key Features | Best For |
|---|---|---|---|
| Model One | $69 | Monochrome screen, 2 physical buttons, 24-word Seed phrase default. | Budget-conscious users, focusing on major assets (BTC, ETH, LTC). |
| Model T | $179 | Color Touchscreen, USB-C, on-device PIN/Passphrase entry. | Advanced users, multi-asset investors (supports more coins like XRP, ADA, XMR), and superior privacy. |
Phase 2: Device Setup and Initialization
Step 1: Install Trezor Suite
- Download and install the official Trezor Suite application (desktop or web) from the Trezor website (
suite.trezor.io). Never use a third-party link.
Step 2: Connect and Install Firmware
- Connect your Trezor device to your computer. The screen will display a lock symbol.
- In Trezor Suite, click “Set up my Trezor.”
- Since Trezor devices ship without firmware, Trezor Suite will immediately prompt you to “Install firmware.” Confirm this, as it is a required safety check to ensure authenticity.
- Once the firmware is installed, select “Create new wallet.”
Step 3: Write Down Your Secret Recovery Phrase (Seed Phrase)
This list of words is the ONLY backup of your funds. It is priceless and must remain secret and offline.
- Select “Standard Seed Backup” (unless you are using the advanced Shamir Backup feature on the Model T/Safe series).
- The Trezor screen will display your 12, 20, or 24-word phrase one word at a time.
- Use the Recovery Card(s) provided in the box to write down each word in the exact sequential order.
- After writing, the device will prompt you to confirm a few random words to verify your transcription.
Step 4: Set Your PIN
- In Trezor Suite, select “Set PIN.”
- Your Trezor device will display a randomized 3x3 grid of numbers.
- For Model One: Look at the grid on your Trezor screen. On your computer screen, click the corresponding dots on the blank keypad to enter your PIN. The numbers change position every time for security.
- For Model T: Enter your PIN directly on the device’s touchscreen.
- Confirm your PIN a second time to finalize the security setting.
Step 5: Activate Coins and Access Suite
- Select which cryptocurrency accounts you want to activate (e.g., Bitcoin, Ethereum). This can be changed later.
- Click “Complete setup,” and you can now access your Trezor Suite, which acts as your secure portal for sending, receiving, and managing your crypto.
Phase 3: Trezor’s Unique Security Features
🔑 Passphrase (Hidden Wallet)
Trezor strongly encourages using a Passphrase—a custom phrase (like a second password) that creates a “Hidden Wallet.”
- How it works: When you connect your Trezor, if you enter your 24-word seed phrase plus a Passphrase (e.g., “MySecretGarden123”), it generates a completely separate wallet address. If you enter the 24-word seed without a Passphrase, it opens your “Standard” wallet.
- Security Benefit: This creates “plausible deniability.” If you are physically coerced into unlocking your wallet, you can give up your PIN and the funds in the visible “Standard” wallet, while your significant funds remain safe in the invisible “Hidden Wallet.”
📝 Understanding Word Length (BIP-39 vs SLIP-39)
Trezor uses different word lengths depending on the model and the desired backup method:
| Word Length | Standard | Default for: | Security Context |
|---|---|---|---|
| 12 Words | BIP-39 | Model T, some new models | Standard 128-bit security. Safe because the PIN is required on the touch device. |
| 20 Words | SLIP-39 | Trezor Safe 3/5 (newer) | Used for Shamir Backup, which splits the phrase into multiple secure “shares.” |
| 24 Words | BIP-39 | Model One | Used for greater security on the Model One, as the recovery entry is done via the computer. |
🏠 Best Practices for Storing the SRP
- Keep it Offline and Separate: Never photograph, store digitally, or keep the phrase near your device.
- Durable Backup: Use the paper card provided, but a stamped metal backup is highly recommended to protect against fire, water, and time.
- Secure Multi-Location: Store your copies (especially the passphrase, if used) in separate, secure locations (e.g., a home safe, a bank safety deposit box, or with a lawyer).
Phase 4: Maintenance and Funding
🔄 Updating Your Trezor Firmware
Firmware updates are done through Trezor Suite and are necessary for security.
- Open Trezor Suite and connect your device.
- If an update is available, Trezor Suite will prompt you.
- Follow the instructions in the app and on your device. The device will confirm a unique fingerprint before installation.
- Always ensure your recovery phrase is accessible during this process, as a firmware update carries a small risk of resetting the device.
💸 Funding Your Cold Storage
After setup, you can transfer assets from an exchange to the secure addresses generated in Trezor Suite.
- Need a guide on which exchange to use or how to make your first crypto purchase? Read Our Complete Guide to the Best Crypto Exchanges and Buying Process Here
Stay in the loop →
Powered by EverRank, and created by GalaxyBuilt
Get Weekly DeFi Alpha in Your Inbox
Weekly DeFi Alpha
56k+ traders getting my private newsletter every week
Join To Download our Ebook Free
Read Next_
Hot vs. Cold Wallet: Your Ultimate Guide to Storing Crypto Safely
Confused about how to hold your crypto securely? This beginner’s guide explains the difference between Hot (Software) and Cold (Hardware) wallets, why your Seed Phrase is sacred, and our top device recommendations for the Solana ecosystem.

How to Audit Smart Contracts on EVM and Solana
Why smart contracts need security checks and how the process works on both Ethereum (Solidity) and Solana (Rust). We break down the four key audit steps, the essential tools (Slither, Clippy, etc.), and what to look for to keep your DeFi funds safe.

How to Revoke Token Allowances on Ethereum, Arbitrum, & BSC
High-volume farming on EVM chains requires connecting to many protocols. Learn what an 'unlimited token allowance' is, why it's a security vulnerability, and the simple, multi-chain method using Revoke.cash to sever unwanted permissions and protect your Ethereum, Arbitrum, BSC, and Polygon funds.