-
 Nefu
Nefu - 30 Dec 2025
- Infrastructure tech
How to Set Up a Bitcoin Lightning Network Node: Beginner's Tutorial for 2026
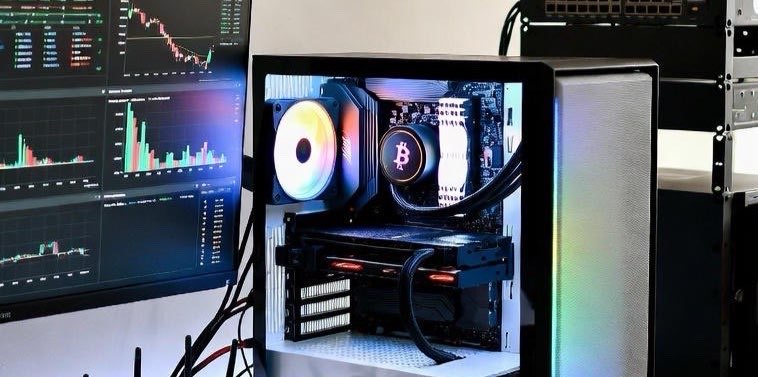
The Lightning Network (LN) builds on Bitcoin's base layer to enable fast, low-cost, and private transactions. In 2026, running a Lightning node is easier than ever, but requires careful setup for security, liquidity, and uptime. This guide assumes you already have a Bitcoin full node running. If you haven't yet, see What Is a Bitcoin Node and Why You Need One and check out our Recommended Hardware for Bitcoin Nodes. A Lightning node is a software client that allows you to open payment channels on Bitcoin. These channels let you transact off-chain, which means faster and cheaper payments without congesting the main blockchain. Key requirements: a synced Bitcoin full node (pruned mode acceptable), stable internet connection, and decent hardware (Raspberry Pi 4+ recommended). Lightning nodes can send and receive instant payments, earn routing fees, and improve privacy compared to on-chain transactions. Step-by-Step Setup Guide Step 1: Prepare Your Bitcoin NodeEnsure your Bitcoin node is fully synced and running reliably. Checklist: Bitcoin Core installed and synced, wallet funded with some BTC (0.01–0.1 BTC for testing), and RPC interface enabled for Lightning communication. Tip: Use a dedicated device or VPS to avoid downtime. Bitcoin Core interface showing synced blocks and wallet balance. Step 2: Install Lightning Node SoftwareTwo main implementations in 2026: LND (Lightning Network Daemon) – beginner-friendly, maintained by Lightning Labs. c-lightning (Core Lightning) – lightweight, highly configurable, maintained by Blockstream.Installation example (LND): wget https://github.com/lightningnetwork/lnd/releases/download/v0.17.0-beta/lnd-linux-arm64-v0.17.0-beta.tar.gz tar -xzf lnd-linux-arm64-v0.17.0-beta.tar.gz sudo install -m 0755 -o root -g root -t /usr/local/bin lnd* Verify signatures using GPG. Terminal showing LND installation. Step 3: Configure Your Lightning NodeCreate lnd.conf with the following: [Application Options] alias=MyLightningNode color=#3399FF listen=0.0.0.0:9735 maxpendingchannels=10 autopilot.active=1 [Bitcoin] bitcoin.active=1 bitcoin.mainnet=1 bitcoin.node=bitcoind Tips: Use a memorable alias/color, enable autopilot for channel management, consider Tor integration. Screenshot of lnd.conf. Step 4: Start Your Lightning NodeStart daemon: lnd --bitcoin.active --bitcoin.mainnet --bitcoin.node=bitcoindCheck status: lncli getinfo – should show public key, node alias, block height, number of active channels. LNCLI output showing node info. Step 5: Fund Your Lightning WalletCreate a new address: lncli newaddress p2wkh and send BTC to it. Wait for confirmations, then you can open channels. Wallet QR code and balance. Step 6: Open Lightning ChannelsOpen channel to peer: lncli openchannel --node_key=<PEER_PUBKEY> --local_amt=50000Tips: Start small (0.01–0.1 BTC), pick well-connected nodes, use 1ML.com or Ride The Lightning to find peers. GUI interface showing channel opening. Step 7: Manage and Monitor ChannelsTools: Ride The Lightning (RTL) – web GUI for channel management, balances, payments ThunderHub – modern dashboard for LND CLI commands: lncli listchannels, lncli closechannel RTL dashboard screenshot.Step 8: Advanced Tips Privacy: route traffic through Tor, avoid reusing addresses. Security: back up channel.backup regularly, keep system updated, configure firewall. Liquidity: monitor inbound/outbound channel balances, rebalance to maximize routing income. Diagram of channel balancing & Tor setup.Benefits of Running a Lightning NodeInstant payments (seconds) Low fees (microtransactions cost-effective) Routing fees (earn by forwarding payments) Improved privacy (less exposure of on-chain activity)Risks and ConsiderationsLiquidity risks (funds locked temporarily) Node downtime (offline nodes miss routing opportunities) Backup responsibility (losing channel.backup = potential lost funds)Tip: Start small, increase channels gradually as you gain experience.Conclusion Running a Lightning Network node in 2026 is accessible but requires care. You can send/receive fast Bitcoin payments, contribute to LN, and earn routing fees while improving privacy. For full setup, review our Bitcoin Node guide and Recommended Hardware. Running both gives the foundation to leverage Bitcoin's layer-2 fully. Hero-style dashboard showing channels, payments, and routing activity.

- Nefu
- 30 Dec 2025
- Getting started
Crypto Fees Explained: Gas, Network Fees, Slippage, and Hidden Costs
Crypto Fees Explained: Gas, Network Fees, Slippage, and Hidden Costs Crypto fees can be confusing and intimidating for beginners. Whether you are sending Bitcoin, trading Ethereum, launching memecoins, minting NFTs, or swapping tokens, fees are everywhere. Understanding the different fee types, their impact, and strategies to reduce them is essential to avoid losing money unnecessarily. This guide covers network fees, gas, slippage, bridge costs, hidden costs, and practical tips for beginners, plus a detailed comparison of fees across major blockchains.1. What Are Crypto Fees? Crypto fees are payments made to network validators or miners to process and secure transactions. Every blockchain requires resources to:Verify transactions Execute smart contracts Maintain consensus and securityThink of fees as the cost of using a decentralized network. Unlike banks, you pay only for the computational work, not hidden overhead. But fees vary widely depending on blockchain type, transaction complexity, and network demand.2. Ethereum Gas Fees Ethereum uses gas fees to power transactions and smart contract execution. 2.1 How Gas WorksGas is a unit measuring computational effort. Each operation in a transaction consumes gas; the more complex the transaction, the more gas required. Users pay gas in ETH, and miners prioritize higher-paying transactions.2.2 Typical CostsSending ETH: ~$1–$5 at normal demand, $20+ during congestion Swapping tokens on Uniswap: $10–$50+ depending on network load Minting NFTs: $50–$200+ at peak demandTip: Beginners should start with small transfers to understand costs. Learn wallet setup here: Set Up Your First Wallet3. Solana and Low-Fee Chains Solana, Avalanche, Cardano (ADA), and other high-throughput chains offer low-cost transactions.Blockchain Average Fee per Transfer Notes for BeginnersSolana (SOL) $0.00025 Ideal for frequent transfers and memecoin activityCardano (ADA) ~$0.20 Fixed fee structure, slower than Solana but reliableXRP ~$0.0004 Extremely low fees, fast settlementBitcoin (BTC) ~$1–$5 Fees spike during congestion; ideal for large transfersEthereum (ETH) ~$1–$50 High fees during peak demand; smart contract interactions expensive3.1 When Low Fees MatterSending small amounts: Avoid Ethereum during congestion Launching memecoins: Low fees reduce friction for participants NFTs: Minting on Solana or Cardano is cheaper than EthereumLearn tools to track fees during memecoin launches: Tools4. Exchange and Platform Fees Centralized exchanges add withdrawal and swap fees on top of network fees.Withdrawal fees vary per exchange (Binance, Coinbase, Kraken). Swap fees are sometimes hidden in price differences (slippage). Bridges between blockchains can charge 0.1%–1%+ per transfer.4.1 Hidden CostsApproval transactions for ERC-20 tokens (Ethereum) require gas. Failed transactions still consume gas. Layer 2 networks (Arbitrum, Optimism) may have additional fees when moving funds on/off Ethereum.5. Slippage Explained Slippage is the difference between expected and executed price in a swap or trade.Happens in low-liquidity tokens or new memecoins. Higher slippage = you pay more than expected. Mitigation: Adjust slippage tolerance in wallets or DEX settings, use large liquidity pools.6. NFT Fees NFTs add additional fee layers beyond simple transfers:Minting Fees: Paid in blockchain native token (ETH, SOL, ADA). Marketplace Fees: Platforms like OpenSea or Magic Eden charge 2.5–5%. Transfer Fees: Moving NFTs between wallets incurs network gas.Example:Blockchain Minting Fee Example NotesEthereum $50–$200+ Gas depends on network congestionSolana ~$0.01–$0.10 Extremely low, beginner-friendlyCardano ~$0.20 Affordable and reliablePolygon ~$0.01–$1 Layer 2 for Ethereum, cheap and fastBeginner Tip: Mint NFTs on low-fee chains if experimenting to avoid overspending.7. Why Fees Exist: Beyond Transfers Fees aren't just for sending coins—they are essential for network security and creation of new assets.Transaction validation: Incentivizes miners/validators Smart contracts: More complex logic = more computation = higher fees NFT minting: Requires recording unique metadata on-chain Token creation: Even creating a new token costs gas (Ethereum: ~$100–$500+)Fees are like a toll for using decentralized infrastructure. Ignoring them can lead to losses, especially when experimenting with small amounts.8. Comparison Table: Fees Across Major ChainsBlockchain Send BTC/Coin Swap/DEX Fee Smart Contract/Token Creation NFT Minting NotesBitcoin (BTC) $1–$5 N/A Limited N/A Best for value transfer, not DeFiEthereum (ETH) $1–$50+ $10–$50+ $50–$500+ $50–$200+ High fees, very secure, largest DeFi ecosystemSolana (SOL) $0.00025 ~$0.001 ~$0.01 ~$0.01 Fast, low-cost, ideal for memecoins and NFTsCardano (ADA) ~$0.20 ~$0.20 ~$0.50 ~$0.20 Low, predictable, slower than SolanaXRP ~$0.0004 ~$0.0004 Limited Limited Ultra-low fees, fastPolygon (MATIC) ~$0.01–$1 ~$0.01–$1 ~$0.05 ~$0.05 Layer 2 on Ethereum, cheaper alternativeBeginner takeaway: Understand which blockchain fits your use case—high-value transfers, NFT experiments, or memecoin launches.9. Strategies to Reduce FeesUse low-fee chains: Solana, Cardano, XRP, Polygon. Batch transfers: Combine multiple transactions where possible. Use Layer 2: Ethereum layer 2 networks reduce gas costs. Avoid peak times: Gas spikes during high network activity (weekends, market events). Check slippage settings: Avoid hidden costs when swapping tokens or providing liquidity.Start small, track costs, and integrate fees into your memecoin or NFT strategy: Tools10. Beginner TakeawaysFees are unavoidable, but understanding them prevents overspending. Different blockchains have radically different fee structures—choose wisely for memecoins, NFTs, or transfers. Slippage and hidden costs matter for swaps, token launches, and liquidity provision. Plan and track using portfolio tools (Portfolio Tracking Guide). Integrate fees into your first 30-day crypto roadmap (Your First 30 Days in Crypto: A Beginner Roadmap).11. Recommended Cluster LinksSet Up Your First Wallet – Secure wallet basics How Crypto Transactions Actually Work: From Click to Confirmation – Understanding blockchain mechanics How to Track Your Crypto Portfolio as a Beginner – Track fees and holdings Tools for Memecoin Launches – Monitor swaps, gas, and slippage What Are Stablecoins and Why Beginners Should Care – Reduce volatility when paying fees What is DeFi? A Simple Beginner's Guide to Decentralized Finance – Fees in lending, DEX swaps, and yield strategiesConclusion Crypto fees are complex but understandable. Beginners must know:Network fees for transfers and transactions Gas fees for smart contracts Slippage and swap costs for DEX trades NFT and token creation costs Hidden costs in approvals and retriesBy choosing the right blockchain, timing transactions, and using tracking tools, beginners can significantly reduce expenses while exploring memecoins, NFTs, and DeFi safely. Understanding fees is essential for budgeting, strategy, and long-term success in crypto.

- Nefu
- 30 Dec 2025
- Getting started
Crypto Scams Explained: How Beginners Actually Get Wiped
Crypto Scams Explained: How Beginners Actually Get Wiped Entering the crypto world is exciting, but it's also a minefield of scams. Beginners are especially vulnerable, often losing funds due to phishing attacks, fake airdrops, malicious smart contracts, and social engineering. The good news is that awareness and preparation are your best defense. This guide will explain the most common scams, provide real-life examples, and give actionable steps to protect your funds. By the end, you'll have a checklist for safe crypto practices and links to cluster articles that expand your knowledge of wallets, DeFi, and portfolio management.1. Phishing Scams Phishing remains the number one way beginners lose crypto. Attackers try to trick you into revealing your private keys, seed phrases, or passwords. Common phishing methods:Emails pretending to be exchanges or wallets: They often use urgent language ("Your account is locked!") with links to fake websites. Fake websites: These look identical to real wallets or exchanges, but any login attempt sends your credentials to scammers. Browser pop-ups and fake MetaMask notifications: These can trick you into signing malicious transactions.Prevention Tips:Always type URLs manually or use official bookmarks. Enable 2FA on every platform. Never share your seed phrase under any circumstance. Learn more about crypto wallet setup in Set Up Your First Wallet.2. Fake Airdrops The idea of free tokens is appealing, which makes fake airdrops one of the oldest crypto scams. Scammers entice beginners by promising high-value tokens in exchange for signing a smart contract or sharing private information. Red Flags:Unsolicited messages claiming "you won tokens!" Requests to approve contracts or transfer crypto to claim your "airdrop." Social media posts from accounts that look official but are fake.Safe Practices:Verify airdrops via official project channels. Never approve unknown contracts; check them with tools like Tools for Scam Protection & Memecoins. Start small on test networks before interacting with mainnet projects. For beginners, see What to Do Before You Buy Your First Crypto to understand safe participation.3. Approval Drainers Approval drainers are malicious contracts that request unlimited access to your tokens. Once approved, they can drain your entire wallet in seconds. Examples:Connecting to a fake decentralized exchange (DEX) and approving token swaps. Interacting with meme tokens or low-liquidity DeFi projects that ask for "infinite approval."How to Protect Yourself:Check and revoke approvals regularly using services like revoke.cash. Limit approvals to specific amounts instead of infinite. Keep your main wallet offline or in a hardware wallet for high-value assets. Learn about wallet security in Best Crypto Wallets for Beginners: Top Picks and Reviews.4. Social Engineering Attacks Social engineering scams rely on trust, not code. Scammers impersonate friends, influencers, or support staff via:Telegram and Discord DMs Twitter/X messages Fake "support" requests asking you to send crypto to solve issuesTips to Avoid Getting Tricked:Never act under pressure. Scammers often create urgency. Verify identities through official channels. Avoid clicking links in DMs from unknown sources. Always double-check any token sale or trade in How to Track Your Crypto Portfolio as a Beginner.5. Advanced Scam ExamplesRug Pulls in DeFi: Developers abandon a project and drain liquidity, leaving investors with worthless tokens. Imposter Tokens: Scammers create tokens mimicking popular coins or NFTs. Pump & Dump Schemes: Coordinated hype artificially inflates token prices, then collapses the market. Malicious Smart Contracts: Hidden functions allow hackers to steal funds even after legitimate transactions.For learning about avoiding these, explore our Do I Have to Pay Taxes on Crypto? A Beginner's Reality Check, which covers DeFi-specific scam risks.6. Beginner TakeawaysStart with awareness: Knowledge of scams prevents panic and mistakes. Test with small amounts: Use tiny amounts to interact with wallets, DEXs, or airdrops. Integrate safety practices early: What to Do Before You Buy Your First Crypto is an essential starting point. Use tracking and compliance tools: Automate wallet monitoring via Tools for Scam Protection & Memecoins. Secure wallets: Consider hardware wallets for long-term storage. Learn more in Best Crypto Wallets for Beginners: Top Picks and Reviews. Follow cluster guides: Keep reading Crypto Fees Explained and How to Track Your Crypto Portfolio as a Beginner for ongoing education.7. Recommended Resources & Cluster LinksSet Up Your First Wallet – Wallet setup for safety Crypto Fees Explained – Understand transaction costs Tools for Scam Protection & Memecoins – Portfolio and approval monitoring Best Crypto Wallets for Beginners: Top Picks and Reviews – Secure storage and hardware wallet guide What to Do Before You Buy Your First Crypto – Step-by-step beginner safety Your First 30 Days in Crypto: A Beginner Roadmap – Beginner roadmap How to Track Your Crypto Portfolio as a Beginner – Compliance and tracking guide Do I Have to Pay Taxes on Crypto? A Beginner's Reality Check – Beginner's guide to crypto taxesFinal Thoughts Crypto scams evolve daily, but most are preventable with knowledge, vigilance, and small-step experimentation. Protecting your wallet, checking approvals, and verifying every link or transaction is non-negotiable. Use this article and the cluster guides as your safety foundation for entering crypto confidently.

- Nefu
- 30 Dec 2025
- Getting started
Do I Have to Pay Taxes on Crypto? A Beginner's Reality Check
Do I Have to Pay Taxes on Crypto? A Beginner's Reality Check Taxes can feel intimidating, but understanding the basics early reduces stress and helps you make better financial decisions. Whether you buy, sell, trade, or hold crypto, knowing when and how taxes apply is essential for avoiding problems down the road.1. Buying vs Selling CryptoBuying crypto: Generally, acquiring crypto with cash, bank transfers, or fiat doesn't trigger a taxable event. Selling crypto: Exchanging crypto for fiat (USD, EUR, etc.) or another crypto token often triggers a capital gains event. Swapping tokens: Swaps between crypto assets (like ETH → SOL) are taxable in many jurisdictions.Pro Tip: Keep detailed records of every purchase, swap, or sale. Tools like Crypto Portfolio Tracking & Compliance Tools help automate this. For beginners, check out Your First 30 Days in Crypto: A Beginner Roadmap to understand how buying and trading affects your overall tax picture.2. Trading vs HoldingShort-term trading: Selling within a year can trigger short-term capital gains, often taxed at your regular income rate. Long-term holding: Holding crypto longer than a year usually triggers long-term capital gains, which may be taxed at lower rates.Practical tip: Consider your holding strategy before selling, as tax implications can significantly impact net profits. Learn more about tracking and analyzing your holdings in our How to Track Your Crypto Portfolio as a Beginner guide.3. When Taxes Really Matter Not every crypto transaction creates a major tax obligation. Here's a simple breakdown:Transaction Type Tax ImplicationSmall hobby purchases or gifts Usually minimal, may not need reportingSelling or swapping crypto Typically taxableEarning interest or staking rewards Often taxable as incomeAirdrops and token rewards Usually considered income at market valueEven if your trades seem minor, keeping records from day one prevents headaches later and ensures smooth compliance. Check our guide on Tools for Tracking & Compliance for automated reporting options and portfolio analysis.4. Beginner TakeawaysDocument everything: Keep track of purchases, swaps, staking rewards, airdrops, and income. Start small: Focus on learning and safety before diving into complex strategies. Use tracking tools: Apps like Crypto Portfolio Tracker save time and reduce errors. Plan trades with taxes in mind: Decide if short-term gains are worth the tax hit versus long-term holding. Educate yourself: Explore Set Up Your First Wallet and Beginner Crypto Security Practices to protect your assets.5. Additional Resources & Cluster LinksYour First 30 Days in Crypto: A Beginner Roadmap – Beginner roadmap Set Up Your First Wallet – Wallet setup guide How to Track Your Crypto Portfolio as a Beginner – Tax & performance tracking Best Crypto Wallets for Beginners: Top Picks and Reviews – Security and storage Ultimate Guide to Crypto Regulatory & Tax Compliance – Deep dive into laws, reporting, and audits Crypto Estate Planning Basics (Secure Your Digital Assets) – Planning inheritance & taxesFinal Thoughts Crypto taxes are unavoidable but manageable. By starting small, tracking all transactions, and educating yourself, you can avoid surprises and make smarter financial choices. Use this guide as your first checkpoint, then explore the linked cluster articles to deepen your knowledge about compliance, wallets, DeFi, and portfolio management.
- Nefu
- 30 Dec 2025
- Getting started
Do I Need KYC to Use Crypto? Beginner's Guide
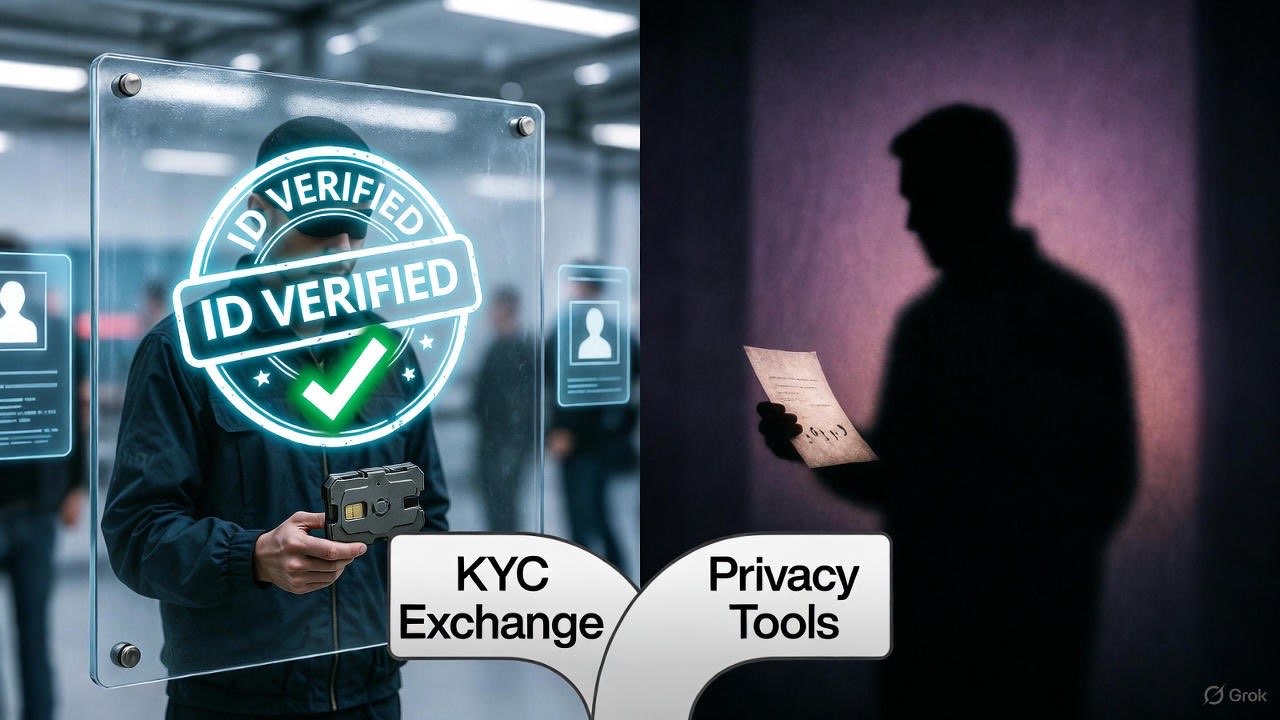
Do I Need KYC to Use Crypto? Beginner's Guide 2026 If you're new to crypto, the term KYC (Know Your Customer) might feel intimidating. Many beginners worry: "Do I have to share all my personal information to start using crypto?" The short answer: it depends on what you're doing. This guide breaks down where KYC is required, where it's optional, and how to safely navigate the crypto world without unnecessary anxiety.Custodial vs. Non-Custodial: Understanding the Difference When you start using crypto, you have two main paths:Custodial services – Exchanges like Coinbase, Binance, or Kraken hold your crypto for you. They almost always require KYC because they operate under local regulations. Non-custodial wallets – Apps like Trust Wallet or hardware wallets give you full control. No KYC is needed because you hold your own private keys.Understanding this distinction helps you know when KYC is actually necessary.Where KYC is Required vs Optional Here's a practical breakdown:Required KYC: Buying crypto with fiat currency (USD, EUR, etc.) on centralized exchanges. Participating in regulated token sales or certain airdrops.Optional or No KYC: Using non-custodial wallets to swap tokens on decentralized exchanges (DEXs). Sending or receiving crypto on-chain directly. Using privacy-focused services that don't interact with banks.This means you can start transacting on-chain without ever sharing personal information, but you'll hit KYC checkpoints when converting between fiat and crypto.On-Ramps vs On-Chain Usage Think of crypto usage in two layers:On-Ramps: Converting your cash into crypto. Usually involves KYC because a financial institution is involved. On-Chain Usage: Moving crypto between wallets, trading on DEXs, or using DeFi apps. Often no KYC is required because blockchain transactions are pseudonymous.For beginners, understanding this distinction reduces fear and confusion.How KYC Anxiety Can Affect Beginners Many new users delay starting because of KYC concerns. The key is to remember:Not every crypto action requires KYC. Non-custodial wallets let you explore, trade, and interact on-chain freely. Knowing where KYC is required allows you to plan your onboarding steps confidently.By separating fiat interactions from on-chain interactions, you can safely experiment and learn.Bridge to Wallet Setup and First Purchase Guides Once you understand KYC, the next steps naturally follow:Set up a secure wallet: Set up your first wallet Make your first crypto purchase safely: First purchase guide Learn essential wallet hygiene: Cold vs Hot Wallets: Optimizing Security and EligibilityThese guides will help you take action without unnecessary risk, making your entry into crypto much smoother.Key TakeawaysKYC is not universally required—it mainly applies when converting fiat to crypto. Custodial vs non-custodial wallets determine when your personal data is exposed. On-chain usage offers privacy and flexibility, ideal for beginners exploring crypto safely. Following wallet and first purchase guides ensures you get started the right way.Understanding KYC is your first step toward becoming a confident crypto user.Next Steps:Explore our Getting Started 🚀 pillar to continue learning how to safely interact with crypto, set up wallets, and make your first purchases.
- Nefu
- 30 Dec 2025
- Getting started
How Crypto Transactions Actually Work: From Click to Confirmation
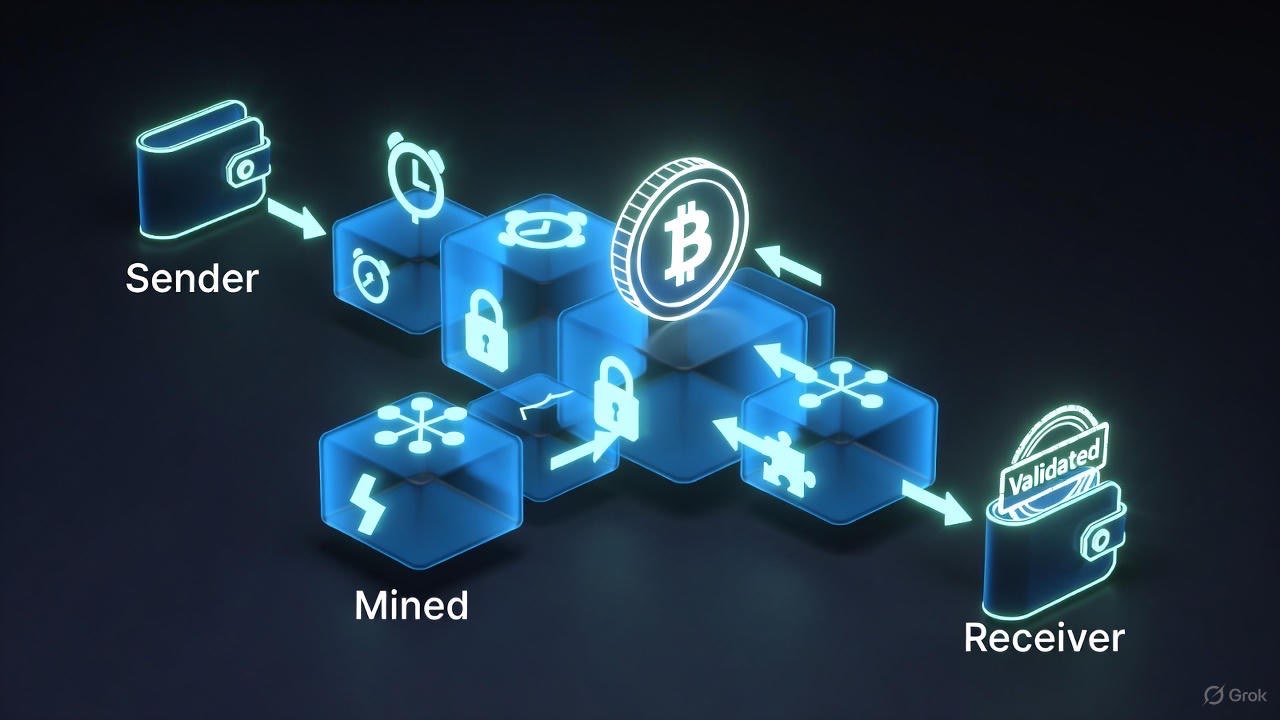
How Crypto Transactions Actually Work: From Click to Confirmation Sending crypto for the first time can feel like stepping into a black box. You click "send" and hope it arrives safely—but what's really happening behind the scenes? Understanding this process will save you confusion, frustration, and even money.1. The Journey of a Transaction Every crypto transaction follows a similar path:You initiate the transaction from your wallet. It enters the mempool, where it waits to be confirmed. Miners or validators pick it up, depending on the blockchain. Confirmations occur, securing the transaction on-chain. It arrives at the recipient address.Think of it as mailing a letter. Your wallet is the post office, the mempool is the sorting facility, miners/validators are the delivery drivers, and confirmations are the signatures ensuring delivery.Pro Tip: Understanding mempools helps you predict delays and fee spikes. Learn more about crypto fees explained.2. Mempool: Where Transactions Wait The mempool is essentially a waiting room for unconfirmed transactions. Every node keeps a copy, and miners/validators pick transactions from this pool.Higher fees = faster inclusion Low-fee transactions may get stuck until congestion eases Monitoring mempools can help you time high-priority transfers3. Gas and Transaction Fees Fees are essential. They incentivize validators to include your transaction in a block.Ethereum: Gas fees vary by network congestion. Use wallets like Trust Wallet to estimate fees. Solana: Typically lower and more predictable. Exchanges: May charge extra withdrawal or conversion fees. Bridges and swaps: Hidden slippage and liquidity costs may apply.Including memecoin transactions? Fees spike during launches—plan accordingly and check our tools page.4. Confirmations: Why They Matter Once a transaction is included in a block:1 confirmation: Usually enough for small transfers 3–6 confirmations: Recommended for large transfers Failed transactions: Rare, but can happen if fees are too low or the network drops5. Failed Transactions: What Went Wrong? Reasons include:Insufficient gas Smart contract errors Network congestion Wallet misconfigurationsAvoid stress by starting with small test transactions. Read more about first-time crypto safety.6. How This Connects to Your Beginner Journey Understanding transactions builds confidence to:Send and receive crypto safely Explore blockchain explorers Prepare for memecoin participation and yield farmingNext, dive into crypto fees explained to understand the costs behind every click.Internal Links for Next Steps:Set Up Your First Wallet Crypto Fees Explained Your First 30 Days in Crypto Tools for Beginners & Memecoin Launches

- Nefu
- 30 Dec 2025
- Getting started
How to Track Your Crypto Portfolio as a Beginner
How to Track Your Crypto Portfolio as a Beginner Tracking your crypto portfolio may seem overwhelming at first. With dozens of wallets, hundreds of tokens, and constant price changes, it's easy to feel lost. But portfolio tracking doesn't have to be complicated, and starting simple is often the best way for beginners to build confidence. This guide covers manual tracking, automated tools, privacy considerations, and best practices, while linking to related beginner resources in our cluster to help you gradually level up.Why Tracking Matters Before diving into methods, it's important to understand why tracking your crypto portfolio is essential:Know your holdings: You can't manage what you don't know you have. Measure performance: Track gains, losses, and allocation over time. Compliance and taxes: Many jurisdictions require reporting on crypto gains. Our crypto tax guide explains this in plain English. Safety and risk management: Seeing all wallets in one place can highlight exposure to risky tokens, rug pulls, or scams. Review crypto scams explained for context.Tracking doesn't have to be a full-time job. Even basic tracking can save you headaches and help you make smarter investment decisions.1. Manual Tracking: The Beginner-Friendly Approach For privacy-conscious beginners, manual tracking is the safest and simplest way to start. All you need is a spreadsheet, a list of wallets, and some basic math. Step 1: Create a Spreadsheet Columns to include:Token Name: e.g., Bitcoin (BTC), Ethereum (ETH), USDC Wallet / Source: e.g., MetaMask, Ledger, exchange account Purchase Date & Price: For tracking gains Quantity Held Current Price Current Value (Quantity × Current Price) Notes: Any special info like staking or locked tokensExample:Token Wallet Purchase Price Quantity Current Price Current Value NotesBTC Ledger $25,000 0.05 $28,000 $1,400 Long-term holdETH MetaMask $1,200 1.5 $1,500 $2,250 Staked on LidoStep 2: Update RegularlyWeekly updates are sufficient for beginners Focus on learning trends, not watching minute-by-minute fluctuations Use live price trackers like CoinGecko or CoinMarketCap to update your current pricesStep 3: Understand Wallet Addresses Manual tracking requires knowing your wallet addresses. Check out our guide on setting up your first wallet to understand address formats and best practices for privacy. Advantages of Manual TrackingFull control over data; no privacy leaks Deep understanding of your portfolio structure Helps beginners learn about tokens, wallet types, and transfersLimitationsTime-consuming as holdings grow Difficult to track multiple wallets and exchanges Not ideal for rapid trading or large-scale memecoin tracking2. Automated Tools for Portfolio Tracking Once comfortable with manual tracking, automated tools make life easier, especially if you're launching multiple tokens or tracking memecoin experiments. Popular Types of ToolsPortfolio Tracker Apps Examples: Blockfolio (FTX), Delta, CoinStats Features: Real-time prices, automatic wallet sync, alerts, price chartsWeb Dashboards & Browser Extensions Track multiple wallets by importing public addresses Pros: No need to give private keys; sync across devicesIntegrated Wallet Apps Some wallets like MetaMask, Phantom, or Exodus show portfolio balances Useful for beginners testing DeFi or NFTsPrivacy ConsiderationsLinking exchanges or wallets exposes your holdings to the platform Avoid apps that require full access to private keys Use apps with read-only public address tracking when possible For more details, see tools for portfolio & memecoinsBest PracticesUse read-only wallet import for security Track only the wallets you actively use Combine manual and automated methods: use a spreadsheet for reference Set up alerts for price changes or suspicious transactions3. Advanced Features: Multi-Wallet & DeFi Tracking As your experience grows, you may interact with:Multiple wallets DEX trading and liquidity pools Staking platforms and yield aggregatorsAutomated trackers can help:Consolidate balances from multiple wallets Track token swaps, LP positions, and staked assets Generate performance summaries for tax or personal reviewBeginners can start small by linking one main wallet and tracking progress over a few months before adding DeFi positions. For a beginner-friendly introduction to DeFi interactions, see DeFi basics for beginners.4. Common Pitfalls for Beginners Pitfall 1: Obsessing Over Minute-to-Minute Prices Watching charts every minute leads to:Stress Impulsive decisions Loss of focus on learningInstead, schedule weekly check-ins or use automated alerts. Pitfall 2: Forgetting to Track Small Wallets Even small wallets can accumulate memecoins or tokens from airdrops. Track them to avoid lost assets. Use tools for portfolio & memecoins to consolidate. Pitfall 3: Ignoring SecurityNever enter your seed phrase in an app or site Regularly check approvals for smart contracts (crypto scams explained) Use hardware wallets for long-term holdings (best crypto wallets)5. Integrating Tracking Into Your First 30 Days A structured approach helps beginners form habits:Day 1–5: Manual tracking for 1–2 wallets Day 6–15: Explore automated apps with read-only import Day 16–30: Track small memecoin experiments and DeFi stakingReference: Your First 30 Days in Crypto6. Taxes and Compliance Even beginners should track cost basis and portfolio history for taxes:Use transaction records from wallets and exchanges Note purchases, sales, swaps, and airdrops Reference our crypto taxes guideAutomated trackers often export CSVs that simplify tax reporting.7. Beginner TakeawaysStart manual tracking to learn wallet basics Add automated tools gradually Track only active wallets initially Combine tracking with safety measures (crypto scams explained) Use weekly reviews instead of constant monitoring Document all trades and DeFi interactions for tax and audit purposes (crypto taxes guide)8. Recommended Resources & Cluster LinksSet Up Your First Wallet – Wallet basics Your First 30 Days in Crypto – Beginner roadmap Tools for Portfolio & Memecoins – Apps and dashboards Crypto Scams Explained – Safety tips Crypto Fees Explained – Learn transaction costs Do I Have to Pay Taxes on Crypto? – Tax basics DeFi Guide for Beginners – Tracking DeFi positionsConclusion Tracking your crypto portfolio as a beginner is about building habits and understanding your holdings. Start manual, gradually integrate tools, and always prioritize security and privacy. By following the cluster guides and using both spreadsheets and read-only apps, beginners can confidently manage multiple wallets, track DeFi positions, and prepare for taxes—all while avoiding common pitfalls. Tracking isn't just about numbers—it's about developing discipline, safety awareness, and strategic insight for long-term success in the crypto ecosystem.